
Good morning/afternoon/evening everyone!
A few weeks ago I produced a quick painting guide to help out my friend Ollie, after he announced he was going to do a Cadian army for 40k. Since then, Die Rolling's DM and guiding light, Jack, has said he's going to do an Imperial Fists army so I thought I'd do a quick guide to help him on his way too.
So, this one's for you, Jack!
IMPERIAL FISTS PRIMARIS INTERCESSOR
With the Cadian guide, I stuck pretty close to the Citadel Paint App's recommended colours and method, using mostly Contrast paints. However, for the Imperial Fist I'm going to do something completely different from either the Classic or Contrast versions on the app, and use a simplified version of the way I used to paint yellow back in the day. The first time I painted an Imperial Fist using this method was for the 3rd Edition Space Marines Codex. I can't remember exactly how the method came about but it was as a way of getting a smooth, strong yellow that would photograph well. The method that was developed was to do a basecoat of Hobgoblin Orange, which as highlighted with multiple layers, adding white each time, to a layer of pure white, which was then glazed with yellow ink. It was a time-consuming process but it made for a better finish than using yellow paint. To save lots of time, I'll be using a much-simplified version, and just use yellow washes over an off-white basecoat.
IMPERIAL FISTS PRIMARIS
Paints used:
Wraithbone spray
Wraithbone
Casandora Yellow
Mephiston Red
Carroburg Crimson
Abaddon Black
The Fang
Eshin Grey
Guilliman Flesh
Reikland Flesh
Cygor Brown
Mournfang Brown
Agrax Earthshade
Leadbelcher
Stormhost Silver
Nuln Oil
Retributor Armour
Liberator Gold
Skeleton Horde
Warpstone Glow
White Scar
Biel-Tan Green
Warplock Bronze
Runelord Brass
Athonian Camoshade
Astrogranite
1. The single most important aspect of this method is that the undercoat must be really smooth and, luckily, Wraithbone spray goes on really, really smoothly and provides the perfect undercoat. You'll notice I've kept the arms, head and backpack off for the sake of convenience, and this is something I always do with Space Marines.

2. So, the main focus and first stage is the armour and this is done with three layers of Casandora Yellow, directly over the undercoat. In the photos below, you can see how the colour is built up over the multiple layers, and how they strengthen and deepen the colours, while providing the variation of colour necessary to provide the shading and highlights required. These layers should be applied as full washes, and allowed to flow well all over the miniature, but care must be taken not to allow them to pool to heavily, and a dry brush can be used to pull any excess away. Each layer must be allowed to dry fully before applying the next and I recommend allowing them to dry naturally instead of using a hair-dryer, as this can cause tide-marks.
3. With the yellow finished, I recommend giving it a spray of varnish to protect the finish. The washes can rub off easily and the varnish will also protect the colour and make it easier to correct any errors that are caused by later colours.
Next up the red areas are painted. The helmet (as this is a sergeant) is painted Mephiston Red, as is the chest eagle and the purity seal on the leg. They are then given a wash of Carroburg Crimson. The eagle and seal are then given a further wash of a mix of Carroburg Crimson and Nuln Oil to darken them and the same mix is used just in the recesses of the helmet. The helmet is then lightened with a re-application of Mephiston Red.

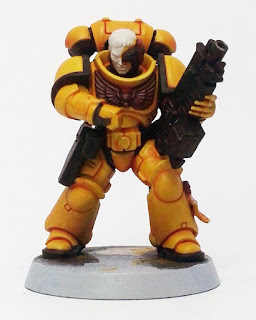
5. Unfortunately, this stage has not come over very well in the photographs, but there's two different shades of grey here. The undersuit, holsters and areas that are meant to be sort of soft rubber are highlighted with a mix of Abaddon Black and Eshin Grey, then with pure Eshin Grey. The areas of hard black, like the gun casing, are highlighted with a mix of Abaddon Black and The Fang, then with pure The Fang.


And there you have it. All done! I hope you've found this little tutorial useful. If there's a tutorial you'd like to see me do, please drop me a line.
Next Sunday, all being well, I'll be doing a few reviews so I hope you'll join me then.
Thanks for reading!
-Stu
A few weeks ago I produced a quick painting guide to help out my friend Ollie, after he announced he was going to do a Cadian army for 40k. Since then, Die Rolling's DM and guiding light, Jack, has said he's going to do an Imperial Fists army so I thought I'd do a quick guide to help him on his way too.
So, this one's for you, Jack!
IMPERIAL FISTS PRIMARIS INTERCESSOR
With the Cadian guide, I stuck pretty close to the Citadel Paint App's recommended colours and method, using mostly Contrast paints. However, for the Imperial Fist I'm going to do something completely different from either the Classic or Contrast versions on the app, and use a simplified version of the way I used to paint yellow back in the day. The first time I painted an Imperial Fist using this method was for the 3rd Edition Space Marines Codex. I can't remember exactly how the method came about but it was as a way of getting a smooth, strong yellow that would photograph well. The method that was developed was to do a basecoat of Hobgoblin Orange, which as highlighted with multiple layers, adding white each time, to a layer of pure white, which was then glazed with yellow ink. It was a time-consuming process but it made for a better finish than using yellow paint. To save lots of time, I'll be using a much-simplified version, and just use yellow washes over an off-white basecoat.
IMPERIAL FISTS PRIMARIS
Paints used:
Wraithbone spray
Wraithbone
Casandora Yellow
Mephiston Red
Carroburg Crimson
Abaddon Black
The Fang
Eshin Grey
Guilliman Flesh
Reikland Flesh
Cygor Brown
Mournfang Brown
Agrax Earthshade
Leadbelcher
Stormhost Silver
Nuln Oil
Retributor Armour
Liberator Gold
Skeleton Horde
Warpstone Glow
White Scar
Biel-Tan Green
Warplock Bronze
Runelord Brass
Athonian Camoshade
Astrogranite
1. The single most important aspect of this method is that the undercoat must be really smooth and, luckily, Wraithbone spray goes on really, really smoothly and provides the perfect undercoat. You'll notice I've kept the arms, head and backpack off for the sake of convenience, and this is something I always do with Space Marines.

 |
 |
 |
3. With the yellow finished, I recommend giving it a spray of varnish to protect the finish. The washes can rub off easily and the varnish will also protect the colour and make it easier to correct any errors that are caused by later colours.
Next up the red areas are painted. The helmet (as this is a sergeant) is painted Mephiston Red, as is the chest eagle and the purity seal on the leg. They are then given a wash of Carroburg Crimson. The eagle and seal are then given a further wash of a mix of Carroburg Crimson and Nuln Oil to darken them and the same mix is used just in the recesses of the helmet. The helmet is then lightened with a re-application of Mephiston Red.

4. At this point, I've stuck the limbs back on for the sake of this article, but normally I'd leave them off. All the areas that are going to be black or metal are undercoated with Abaddon Black.

5. Unfortunately, this stage has not come over very well in the photographs, but there's two different shades of grey here. The undersuit, holsters and areas that are meant to be sort of soft rubber are highlighted with a mix of Abaddon Black and Eshin Grey, then with pure Eshin Grey. The areas of hard black, like the gun casing, are highlighted with a mix of Abaddon Black and The Fang, then with pure The Fang.

6. Next up is the skin and hair. Before painting these I re-undercoated them with the Wraithbone base paint, to give a decent flat base. The face was given a layer of Guilliman Flesh and then a wash of Reikland Fleshshade. A touch of Agrax Earthshade was applied around the eyes and under the chin to give a bit of extra definition. The hair was painted with Cygor Brown then, while this was still wet and slightly sticky, Mournfang Brown was stippled on to give a bit of texture to it.

7. The metal areas are painted next. They are basecoated with Leadbelcher, leaving the Abaddon Black to show through in the recesses. This is then highlighted with Stormhost Silver before being given an all-over wash of Nuln Oil.

8. Next up are the small details. These aren't hugely essential for tabletop miniatures, but the do add a nice finishing touch. Gold areas are painted with Retributor Armour, then highlighted with Liberator Gold before being given a wash of Agrax Earthshade. The scroll on the purity seal is given a touch of Skeleton Horde. The bullet casings in the magazine are painted with Warplock Bronze then Runelord Brass, before being given a wash of Athonian Camoshade. The bionic eye and helmet lenses are painted with Warpstone Glow and a tiny spot of White Scar is applied in the top corner, before a wash of Biel-Tan Green is applied.

9. Finally, the base can be done to finish off the miniature. In this case, a coat of Astrogranite was applied and, when it's dried, a wash of Nuln Oil was applied before the edge of the base was painted with Abaddon Black.

And there you have it. All done! I hope you've found this little tutorial useful. If there's a tutorial you'd like to see me do, please drop me a line.
Next Sunday, all being well, I'll be doing a few reviews so I hope you'll join me then.
Thanks for reading!
-Stu
No comments:
Post a Comment